To set your dedicated GPU as the default, go to system settings or the GPU control panel and select it for apps or games.
In this article, we’ll walk you through the steps to change the default display adapter to your dedicated GPU.This guide is designed to be clear and easy to understand, so even if you’re not tech-savvy, you’ll be able to follow the steps without any problem.
What is a Dedicated GPU?

Before we dive into the steps, let’s first understand what a dedicated GPU is and why it’s important.
- Dedicated GPU: This is a separate graphics card installed in your computer. It has its own memory (VRAM) and is specifically designed to handle demanding graphics-related tasks, like gaming, 3D rendering, and video editing. Examples of dedicated GPUs are NVIDIA GeForce and AMD Radeon cards.
- Integrated Graphics: Integrated graphics are built into your computer’s processor (CPU) and use shared memory (RAM). While they are good for basic tasks like browsing the web or watching videos, they are not powerful enough for high-end gaming or video rendering.
By changing your default display adapter to the dedicated GPU, you can ensure that your computer uses the more powerful graphics card for intensive tasks.
How to set a dedicated GPU as default?
To set your dedicated GPU as the default, open the NVIDIA Control Panel or AMD Radeon Settings. For NVIDIA, go to Manage 3D Settings and select High-performance NVIDIA processor under Global Settings. For AMD, go to Switchable Graphics in the System tab and set High Performance for the apps or globally. You can also adjust settings in Windows Graphics Settings by selecting High performance for specific apps. Make sure to apply the changes and check power settings to prevent auto-switching to integrated graphics, especially on laptops.
Also read: 0xe0434f4d Error Code Gpu Crash – Gpu Crash And How To Fix It!
Why Should You Switch to a Dedicated GPU?
There are several reasons why you might want to switch your default display adapter to a dedicated GPU:
- Improved Performance: A dedicated GPU offers much better performance compared to integrated graphics, especially in graphically demanding tasks.
- Better Gaming Experience: If you’re a gamer, switching to a dedicated GPU ensures smoother gameplay and higher frame rates in modern games.
- Faster Rendering and Video Editing: For content creators, dedicated GPUs can speed up video editing, rendering, and other graphical tasks.
- Multi-Tasking: Dedicated GPUs can handle multiple tasks simultaneously, allowing you to run multiple programs without performance drops.
Now that you know why it’s important, let’s look at how to switch the default display adapter.
Step-by-Step Guide to Change the Default Display Adapter to a Dedicated GPU:
Changing the default GPU depends on your operating system and GPU brand (NVIDIA or AMD). Here’s how to do it for both Windows and macOS users.
For Windows Users:
Use Windows Graphics Settings:
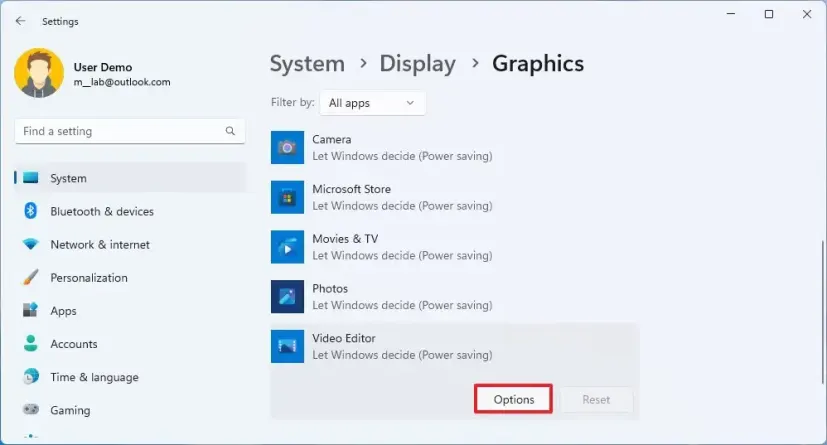
Windows 10 and 11 allow you to assign a dedicated GPU to specific applications.
Steps to Set the Dedicated GPU:
- Right-click on the desktop and select Display Settings.
- Scroll down and click on Graphics Settings.
- Under Graphics performance preference, click Browse.
- Find and select the executable file of the app you want to assign to the dedicated GPU.
- After adding the app, click on it, then select Options.
- Choose High Performance (this corresponds to the dedicated GPU).
- Click Save.
Once set, Windows will use the dedicated GPU for the selected application. Repeat the process for other apps as needed
NVIDIA Control Panel (for NVIDIA GPUs):

If you have an NVIDIA GPU, you can set the default GPU using the NVIDIA Control Panel.
Steps to Assign a Dedicated GPU Using NVIDIA Control Panel:
- Right-click on the desktop and select NVIDIA Control Panel.
- In the left pane, go to Manage 3D Settings under the 3D Settings section.
- Click on the Program Settings tab.
- From the dropdown menu, select the application you want to assign to the dedicated GPU. If it’s not listed, click Add and browse for it.
- Under Preferred graphics processor, choose High-performance NVIDIA processor.
- Click Apply to save the changes.
The selected app will now always use the NVIDIA GPU, even if the system defaults to the integrated GPU.
AMD Radeon Settings (for AMD GPUs):
For AMD GPUs, you can assign the dedicated GPU to specific applications through AMD Radeon Settings.
Steps to Assign a Dedicated GPU Using AMD Radeon Settings:
- Right-click on the desktop and select AMD Radeon Settings.
- In the window that appears, go to the System tab, and select Switchable Graphics.
- In the list of applications, click the dropdown next to the app you want to assign the dedicated GPU to.
- Choose High Performance to assign the dedicated AMD GPU.
- Click Apply to confirm the changes.
The selected app will now use the AMD GPU for high-performance tasks.
Troubleshooting: What to Do if Your Dedicated GPU Is Not Being Used
Update Drivers and Reboot:
Outdated or missing GPU drivers can prevent your dedicated GPU from being used. Download the latest drivers from NVIDIA or AMD’s official website. After installation, reboot your system to apply the changes. A restart ensures that the operating system recognizes and switches to the dedicated GPU, improving performance and preventing the system from defaulting to integrated graphics.
Also read: Can You Upgrade Dell Latitude Gpu – The Best Option For Dell Latitude Users!
Check BIOS and Power Settings:
Access BIOS/UEFI and ensure the dedicated GPU is set as the primary graphics device. You may need to disable the integrated GPU if it’s causing conflicts. On laptops, adjust your power settings to High Performance in Power Options to prevent automatic switching to integrated graphics. This ensures your dedicated GPU is prioritized for demanding tasks and games.
Check Application Settings:
Some applications, like games or professional software, require manual GPU selection. Check the app’s settings and ensure it’s configured to use the dedicated GPU. Many apps default to integrated graphics, so manually selecting the dedicated GPU in the graphics settings improves performance, especially in resource-intensive applications like gaming, video editing, or 3D rendering, ensuring optimal use of your dedicated GPU.
General Tips for Managing Your GPUs:
- Update Drivers Regularly: To ensure maximum compatibility and performance, keep your GPU drivers updated. Both NVIDIA and AMD frequently release driver updates that improve performance, fix bugs, and support the latest games and applications.
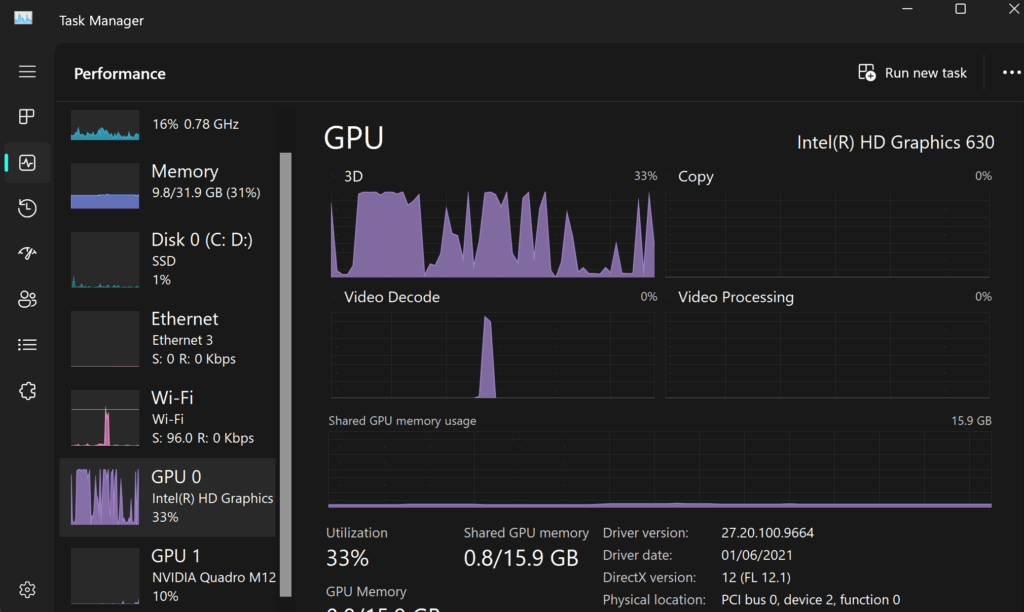
- Monitor GPU Usage: Tools like Task Manager (Windows) or Activity Monitor (macOS) can help you track GPU usage. You can monitor whether your dedicated GPU is being utilized properly and adjust settings accordingly.
- Use Software Solutions for Better GPU Management: If you’re looking for more advanced control, there are third-party software options that allow you to manually toggle between integrated and dedicated GPUs.
- Check Power Settings: On laptops, power settings can impact GPU selection. Ensure that your power plan is set to High Performance for optimal GPU performance, especially when plugged into power.
FAQ’s
1. What is a dedicated GPU?
A dedicated GPU is a separate graphics card designed for handling demanding tasks like gaming and video editing, offering better performance than integrated graphics.
2. How do I switch to my dedicated GPU?
You can switch to your dedicated GPU by using the NVIDIA Control Panel or AMD Radeon Settings, or by selecting it in your system’s graphics settings for specific applications.
3. Why is my computer using integrated graphics instead of the dedicated GPU?
Your computer may default to integrated graphics for power-saving reasons or if the dedicated GPU isn’t properly selected in settings or drivers.
4. Will using a dedicated GPU improve gaming performance?
Yes, a dedicated GPU provides better performance for gaming, offering higher frame rates and smoother graphics, especially in demanding games.
5. How can I check if my dedicated GPU is active?
You can check GPU activity in Task Manager under the “Performance” tab or by using tools like GPU-Z to monitor GPU usage.
Conclusion
In conclusion, switching to a dedicated GPU boosts performance for gaming, video editing, and demanding tasks. By adjusting settings in your system or GPU control panel, you can easily assign the dedicated GPU to specific apps. Always keep your GPU drivers updated and check power settings, especially on laptops, to ensure your dedicated GPU is used effectively for optimal performance.


